Penjelasan Arduino Uno R3 Software IMAGESEE
Arduino® UNO R3 4 / 1 3 Arduino® UNO R3 Modified: 27/01/2023 1 The Board 1.1 Application Examples The UNO board is the flagship product of Arduino. Regardless if you are new to the world of electronics or will use the UNO as a tool for education purposes or industry-related tasks.
Arduino UNO R3 Invize AB
UNO R3. The Arduino UNO is the best board to get started with electronics and coding. If this is your first experience tinkering with the platform, the UNO is the most robust board you can start playing with.. Arduino UNO is a microcontroller board based on the ATmega328P. It has 14 digital input/output pins (of which 6 can be used as PWM.

Arduino Uno R3 Ch340g Atmega328p Cable For Arduino Uno Transparent Images
UNO R3 SMD. The Arduino UNO is the best board to get started with electronics and coding. If this is your first experience tinkering with the platform, the UNO is the most robust board you can start playing with.. Arduino UNO SMD is a microcontroller board based on the ATmega328P. It has 14 digital input/output pins (of which 6 can be used.

Mengenal Arduino Uno dan Cara Installasi Arduino IDE idmetafora
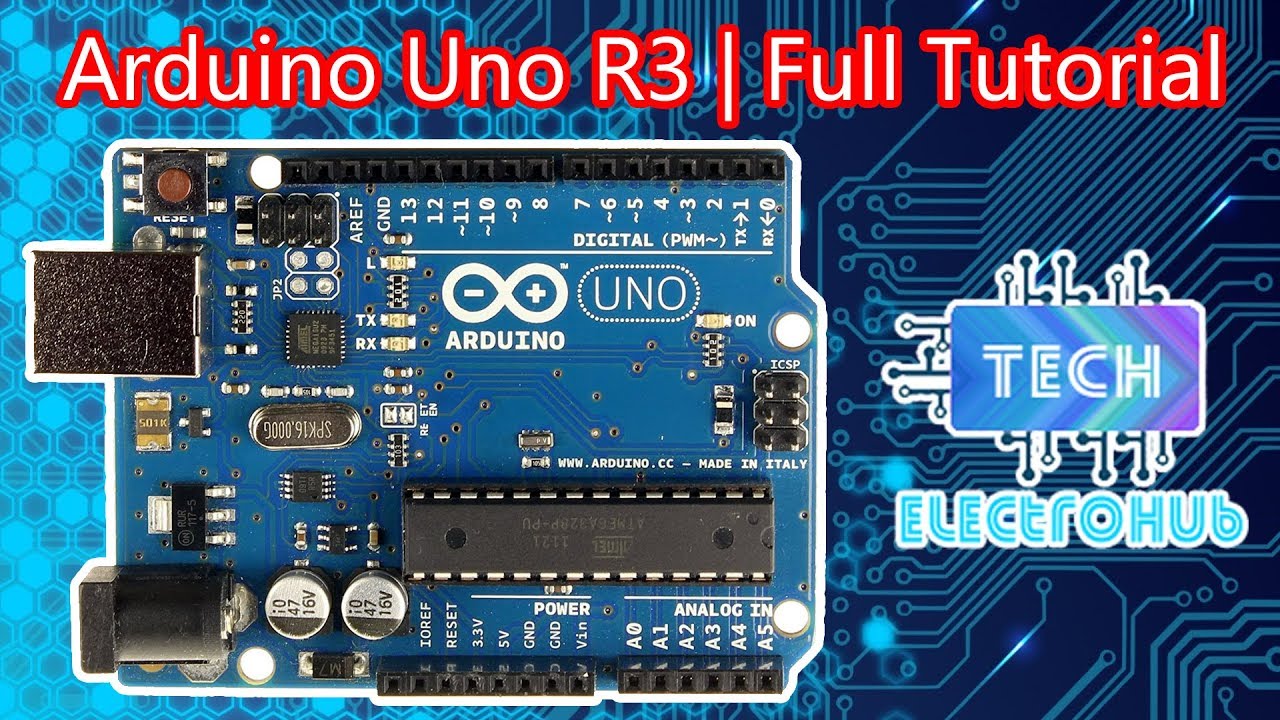
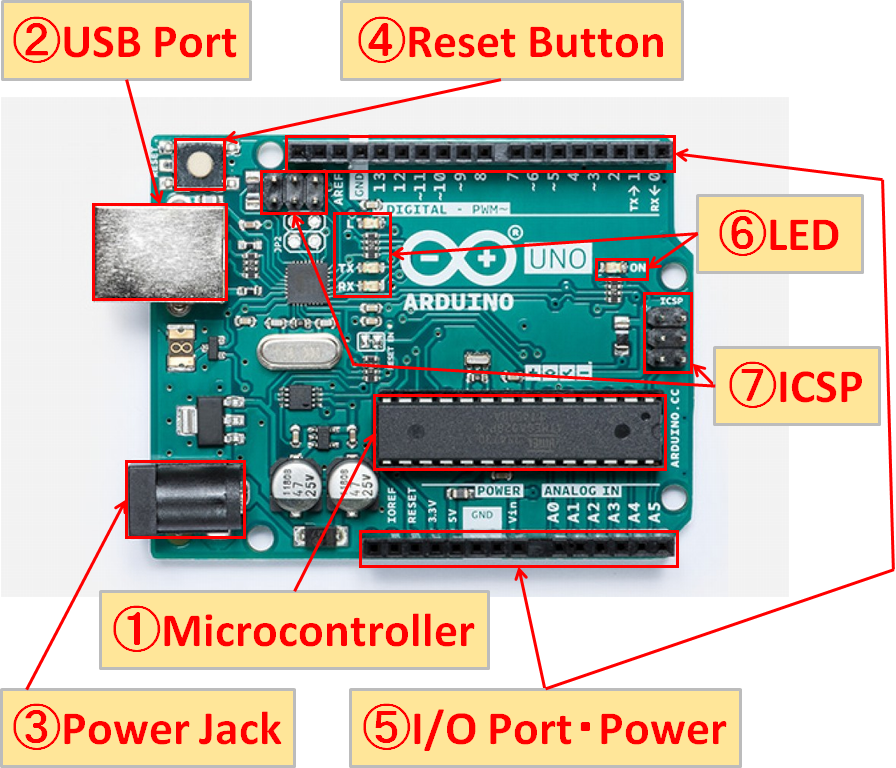
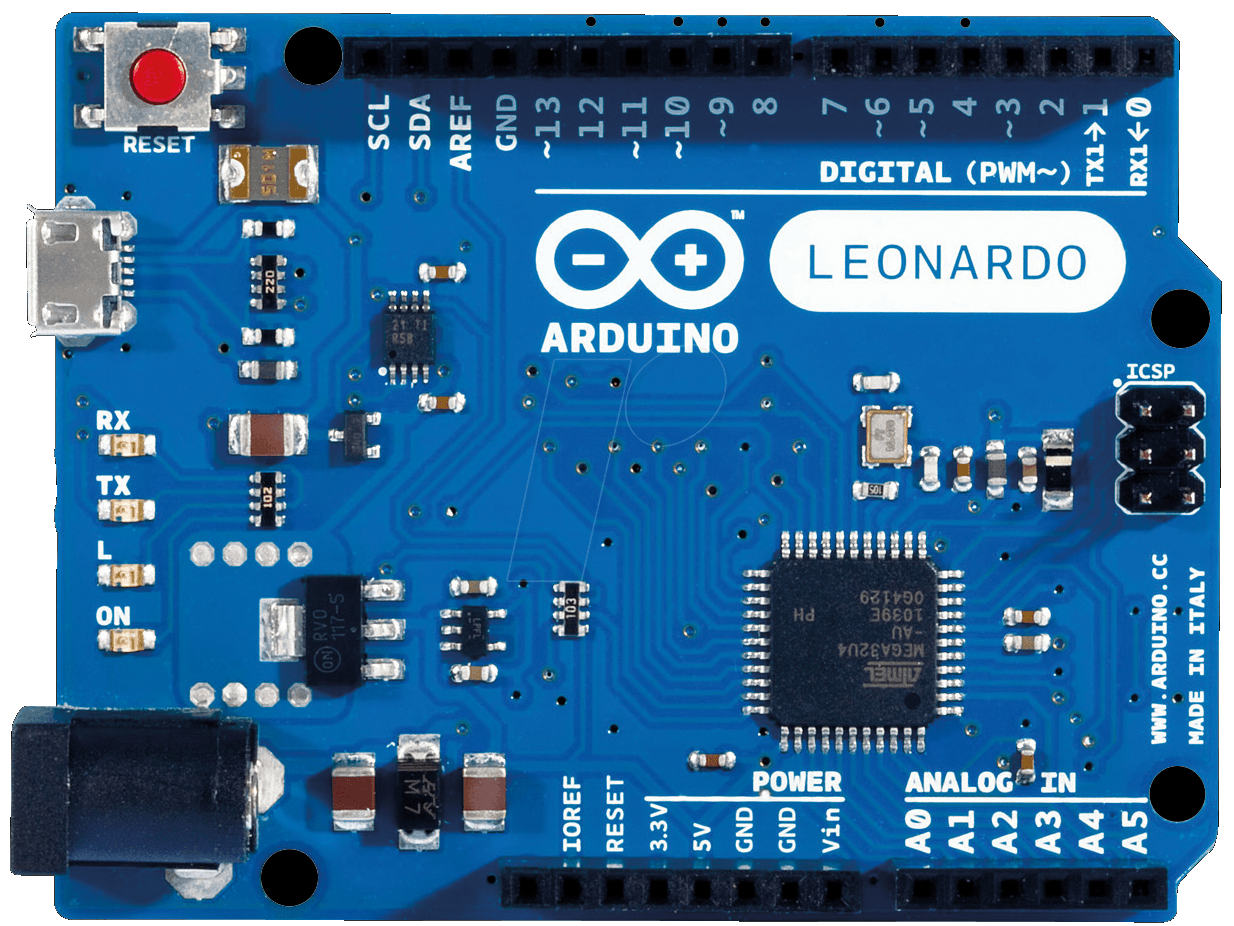
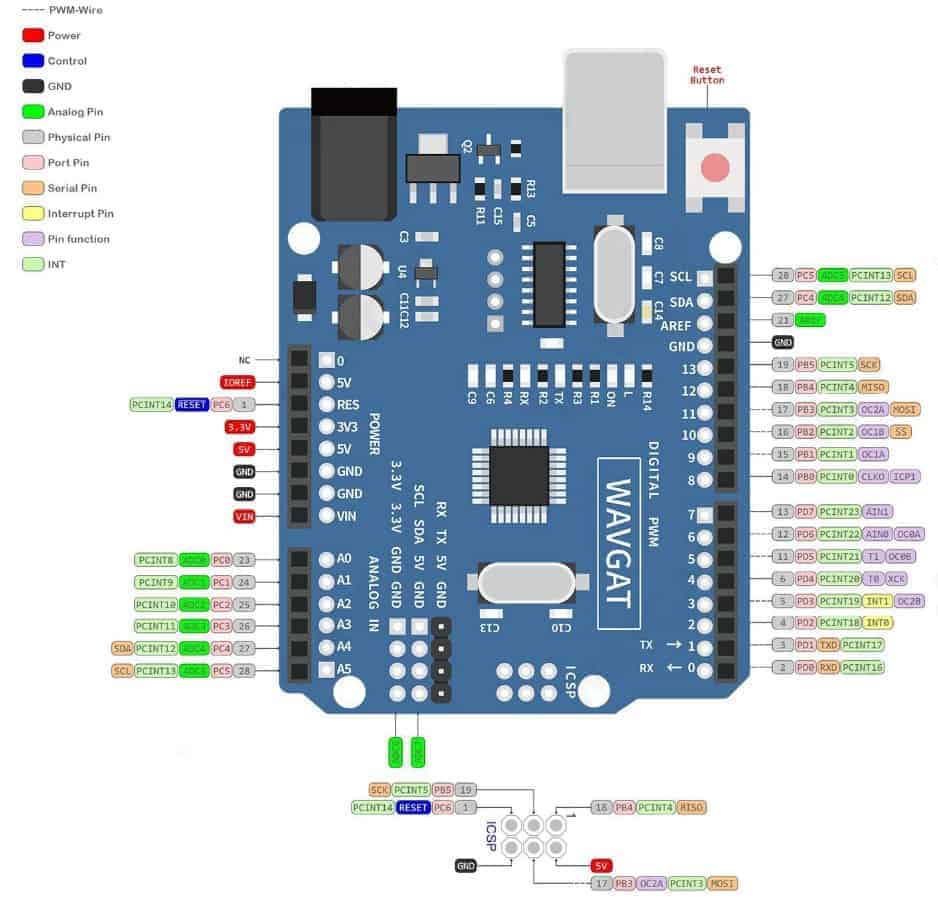
Inti dari Arduino Uno R3 adalah chip mikrokontroler ATmega328P, yang menjadi otak dari berbagai proyek elektronik yang dapat buat dengan menggunakan Arduino. Nama "Uno" berasal dari bahasa Italia yang berarti satu, terpilih sebagai simbol untuk merayakan perilisan Arduino Software (IDE) versi 1.0. Bagian-bagian dari Arduino Uno sebagai berikut:
Arduino Uno R3 136.00 en Mercado Libre
The Arduino UNO R3 is the perfect board to get familiar with electronics and coding. This versatile microcontroller. is equipped with the well-known ATmega328P and the ATMega 16U2 Processor. This board will give you a great first experience within the world of Arduino.
Penjelasan Arduino Uno R3 Specifications IMAGESEE
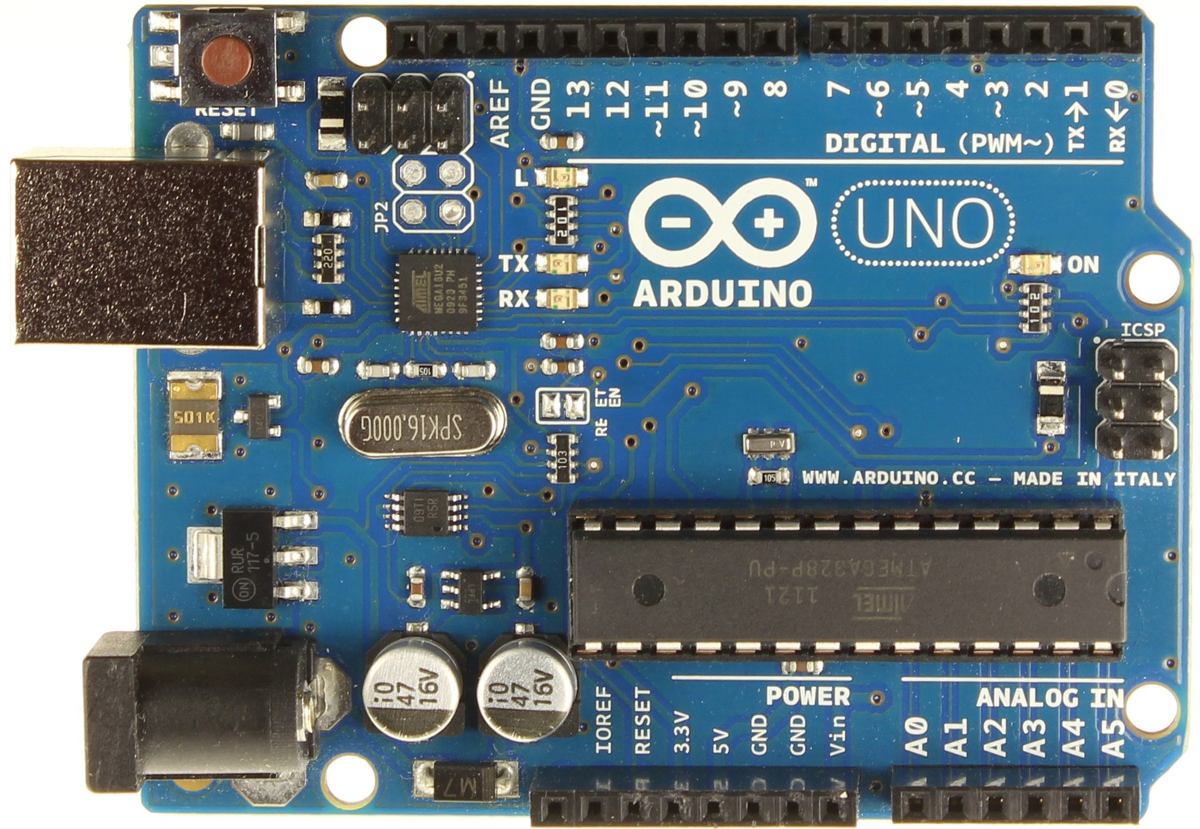
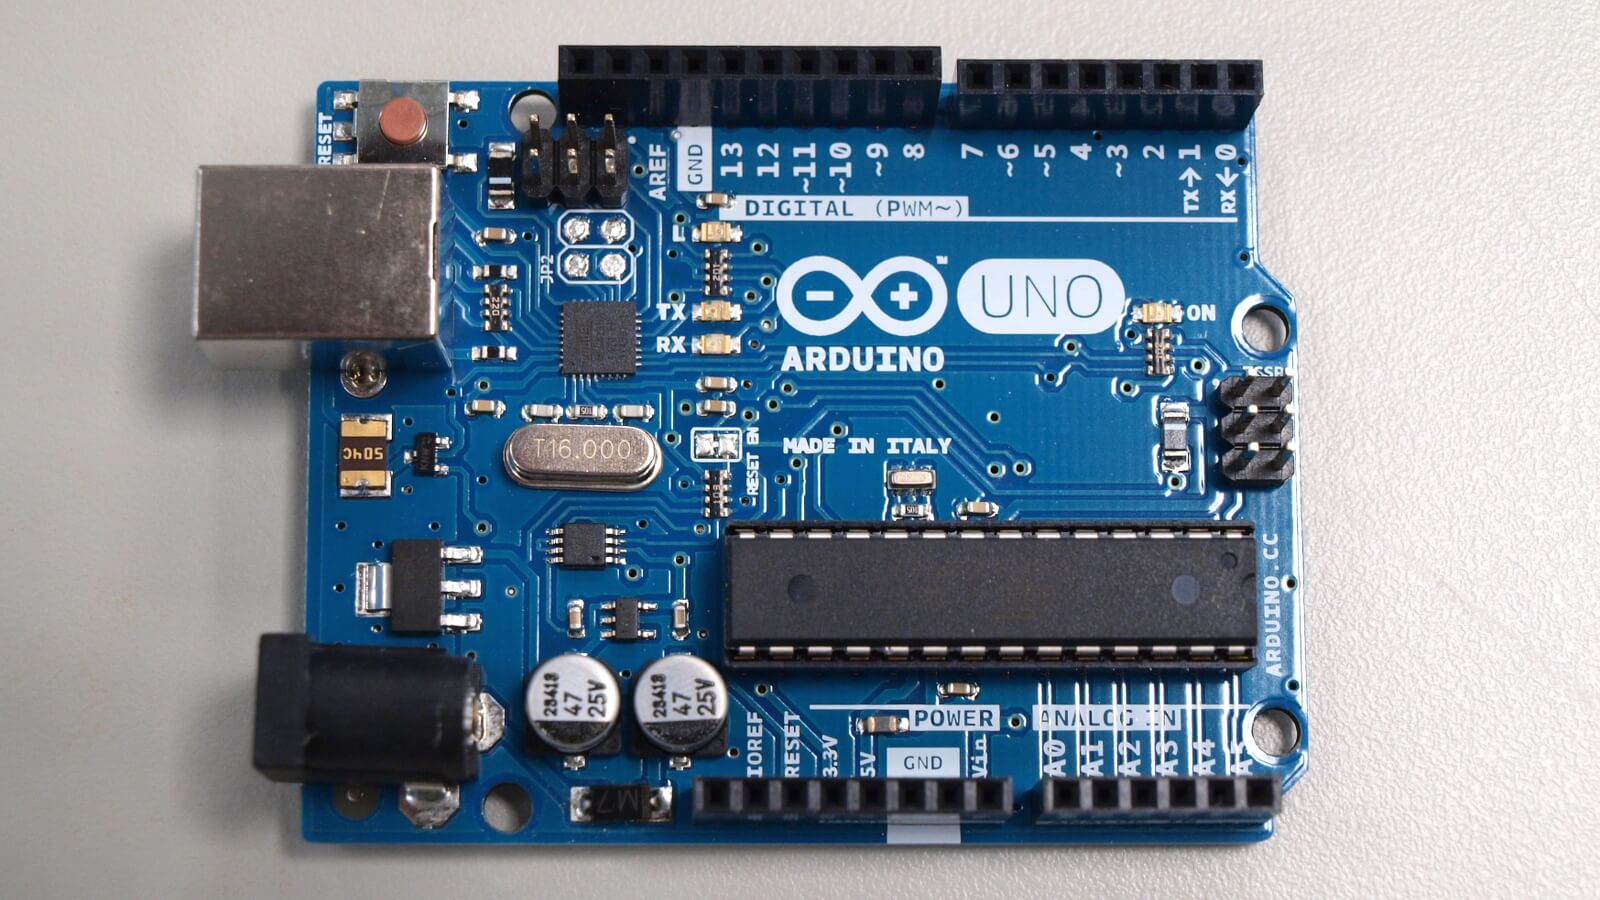
Arduino Uno R3 adalah sebuah papan/board mikrokontroler yang telah melalui pengembangan hingga ke tahap revisi 3 berbasis chip ATMega328p. Jenis arduino ini memiliki 14 buah pin digital input/output (I/O) yang mana 6 di antaranya dapat anda gunakan sebagai output PWM. Selain itu ia juga memiliki 6 input analog, clock speed 16MHz, konektor USB tipe B, jack listrik, tombol reset dan ICSP header.

Bagian Bagian Arduino Uno
Setiap 14 pin digital pada Arduino Uno dapat digunakan sebagai input dan output, menggunakan fungsi pinMode(), digitalWrite(), dan digitalRead(). Masing-masing fungsi tersebut beroperasi pada tegangan 5 volt. Setiap pin dapat memberikan atau menerima suatu arus maksimum 40 mA dan mempunyai sebuah resistor pull-up 20-50 kOhm. Arduino Uno memiliki sejumlah fasilitas untuk berkomunikasi dengan.

Penjelasan Tentang Arduino UnoR3 Saveltop
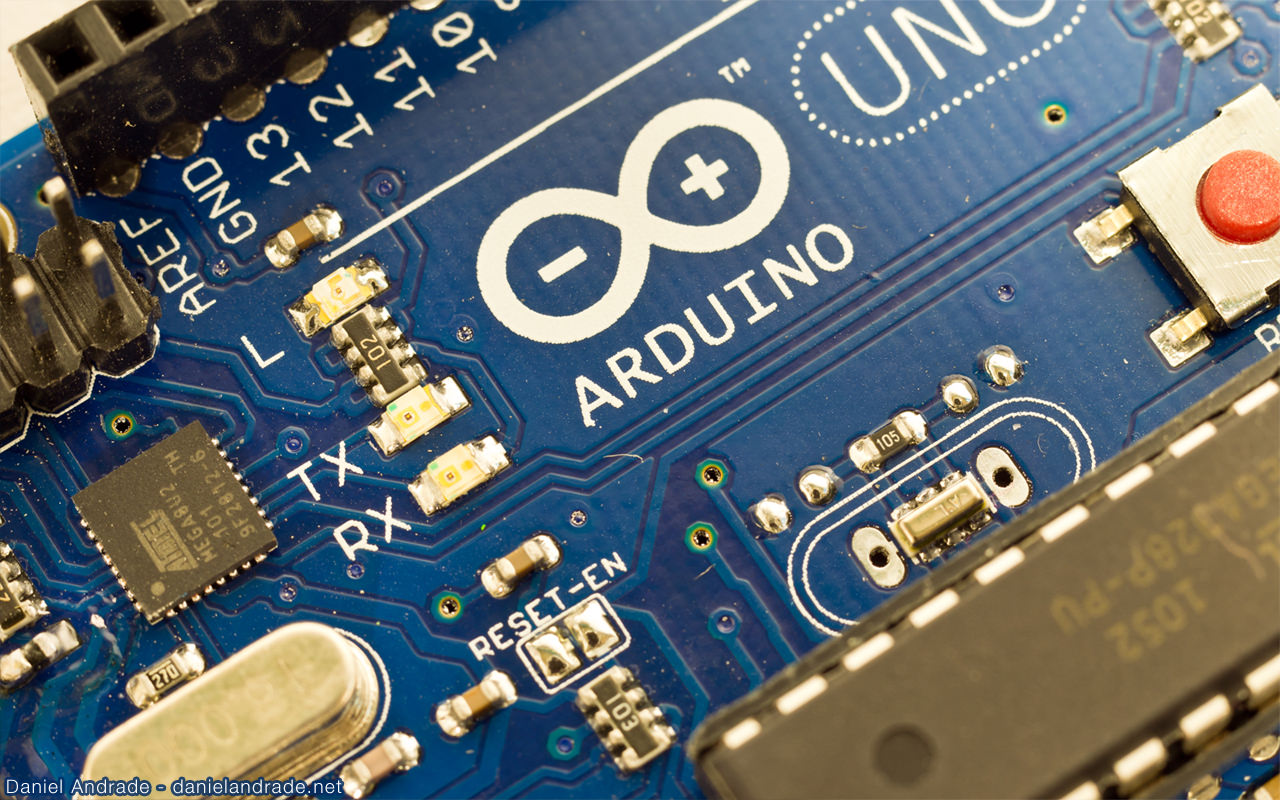
Gambar Arduino Uno Beserta Penjelasan Fungsi Bagian-Bagiannya ( Arduino board explanation ) Sebagai media untuk komunikasi serial antara komputer dan Arduino R3 maupun sebaliknya. Crystal Oscillator, fungsi crystal oscillator adalah sebagai jantung Arduino yang membuat dan mengirimkan detak ke mikrokontroler agar beroperasi setiap detaknya.

Apa itu Arduino, Pengertian dan Spesifikasi Arduino Uno R3 Prevent
To get started, follow these steps: Connect your Arduino board to your computer using a USB cable. Launch the Arduino IDE software. In the Arduino IDE, go to File -> New to create a new sketch. Copy and paste the above code into the Arduino IDE. Go to Tools -> Board and select the appropriate board (e.g., Arduino Uno).
Penjelasan Arduino Uno R3 Specifications IMAGESEE
UNO R3 + WIFI ESP8266 + CH340G Arduino and WIFI - a Versatile Development Board: This project shows how to use the ATmega328 and ESP8266 single board manufactured by Robodyn that allows for wifi connectivity to an Arduino on a single development board. This specific development board has numerous advantages (which will be covere…
Arduino Uno R3 from Wavgat
Elga Aris Prastyo 22.01. Arduino UNO R3 adalah pilihan terbaik untuk memulai dengan belajar elektronik beserta coding. Jika ini adalah pengalaman pertama Anda bereksperimen dengan UNO sangat cocok. Hal ini dikarenakan Board ini adalah papan paling kuat untuk Anda dalam memulai eksperimen. UNO adalah salah satu yang paling banyak digunakan dan.
Penjelasan Tentang Arduino UnoR3 Saveltop
The Arduino Uno is an open-source microcontroller board based on the Microchip ATmega328P microcontroller (MCU) and developed by Arduino.cc and initially released in 2010. The microcontroller board is equipped with sets of digital and analog input/output (I/O) pins that may be interfaced to various expansion boards (shields) and other circuits. The board has 14 digital I/O pins (six capable of.

1 Pengenalan Bagian Arduino UNO R3 YouTube
Finally, navigate to and select the driver file named "arduino.inf", located in the "Drivers" folder of the Arduino Software download (not the "FTDI USB Drivers" sub-directory). If you are using an old version of the IDE (1.0.3 or older), choose the Uno driver file named "Arduino UNO.inf" Windows will finish up the driver installation from there.

Arduino Uno R3 SMD Australia Little Bird
Arduino UNO R3 SMD. The difference between the two comes down to the AVR chip package used. In the UNO SMD (Surface Mounted Device) the microprocessor chip (ATmega328) is integrated and soldered onto the board; while in the standard UNO, the ATmega328 is DIP (Dual In-line Packaged), which means that the microprocessor chip can easily be removed.
Penjelasan Arduino Uno R3 Software IMAGESEE
Arduino Uno R3 vs CH340. The CH340 Arduino board contains an ATmega328P-U-TH chip, which differs from the classic ATmega328P-PU in official Arduino Uno Rev3 boards. The CH340 is an inexpensive USB-to-Serial chip (datasheet here) that takes the place of the Rev3 board's more expensive ATmega16U2. This creates issues when programming the.

Austral 3D Rosario Arduino Uno R3 Cable Usb Domotica Robotica Atmel
Introduction. Overview of Arduino Uno R3. Key Features and Specifications. Applications of Arduino Uno R3. Getting Started with Arduino Uno R3. Step 1: Install the Arduino IDE. Step 2: Connect the Arduino Uno R3. Step 3: Select the Board and Port. Step 4: Write and Upload Your First Sketch.
